Being one of the top social media, Instagram does not stop there and constantly elaborates new features to meet and exceed the expectations of users. One of them is E-commerce (electronic commerce) which is, if say in metaphorical language, a hygienic standard in modern society. Offline shopping is still not gone but his online brother-in-arms is actively strengthening its positions.
According to Tech.co, social commerce is one of the most growing trends that brands just can’t ignore. 55% of people have ever bought products through social media, therefore, it’s proof that we want to make purchases without leaving this or that social network.
Today we are going to talk about selling items on Instagram. If you have a business that sells products (especially in the fashion or beauty niche) with an Instagram presence, it’s a must to implement Instagram Shopping. We have compiled a guide on how to get approved for shopping on Instagram and set up everything so that it works. Let’s start!
What do you need to do to get approved for shopping on Instagram
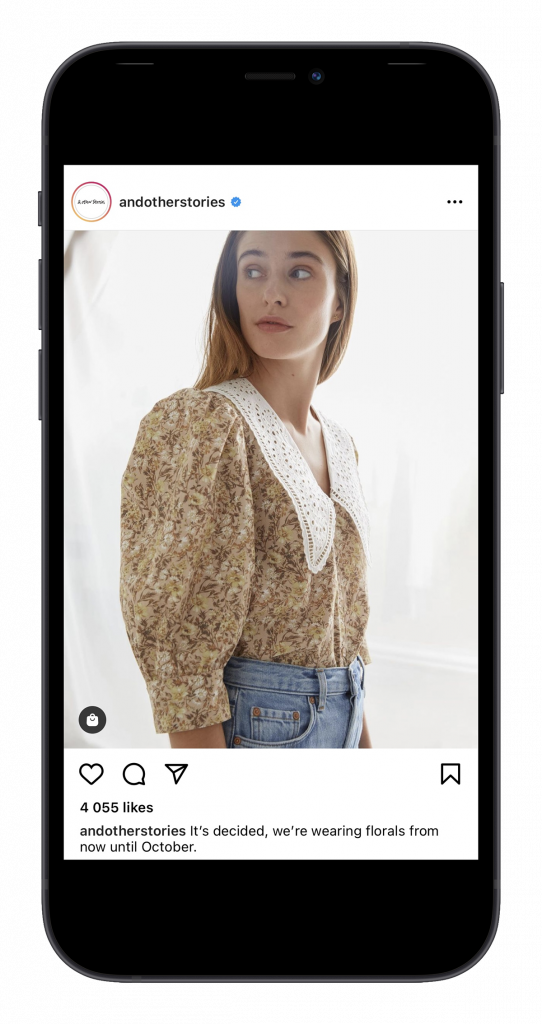
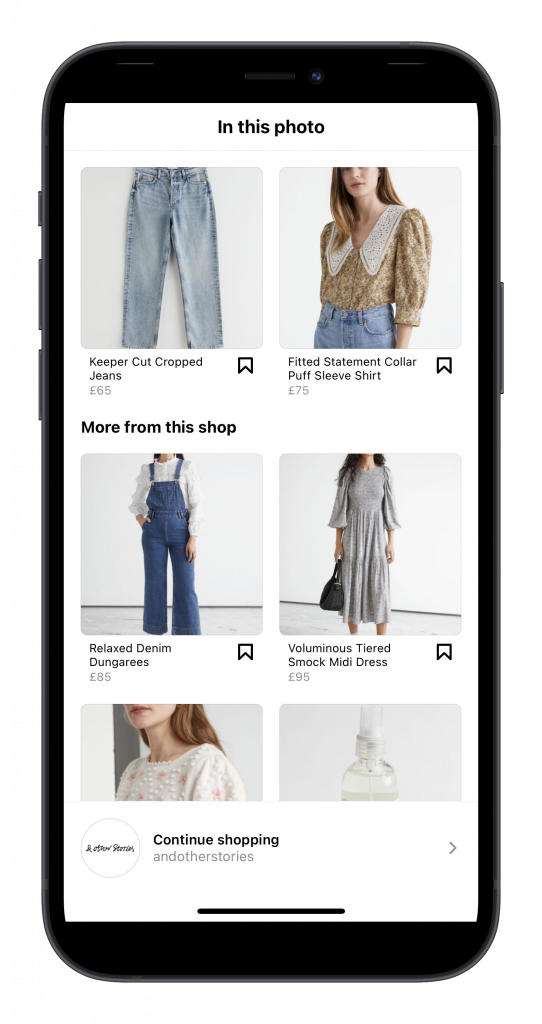
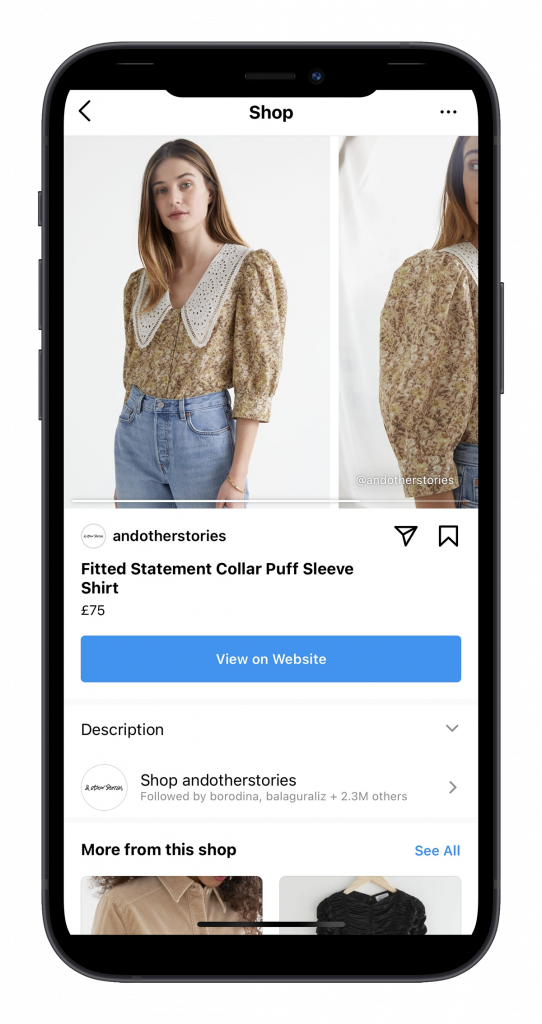
Instagram Shopping is a feature that provides users with an opportunity to buy products directly by tapping on photos, videos, and Instagram Stories. There are special shopping tags that appear in the photo/video in response to the user’s touch. Tapping on them, a user gets to the page with a price and a short description of the product. From there, he can go to the online store to learn more about the product and purchase it. In a word, with shopping tags, an Instagram account turns into a virtual showcase, which allows people to make purchases directly from a brand’s Instagram account very quickly and conveniently.
There are some cases when users were denied for setting up a shop on Instagram. That is why we have created a step-by-step guide on what you should do to get approved for Instagram Shopping.
Please note: here is the list of the countries where shopping tags are available. Check if your country is on the list, and then go ahead.
Keep in mind: there are also some items besides the geography that can hinder you to set up a shop on Instagram. For example, if you sell services, not physical goods, or if you sell illegal goods such as weapons, animals, etc.
So, finally, what are the steps?
Check if you meet Commerce Eligibility Requirements
All these requirements are described via this link. We will briefly outline them below:
- Comply with the policies. There are several of them: Facebook’s Terms of Service, Community Standards, Ads Policies, etc.
- The products that you will later add to the shop on Facebook and Instagram must be available for direct purchase on your website.
- Prove your trustworthiness. Your account and products must be authentic. If you have a massive following in your account and a verification badge, it is likely to help your brand get approved for Instagram Shopping quicker.
- Provide your clients with accurate information about pricing, availability of products as well as clarify return policies.
Get your website ready
There is no point in even trying to get approved for shopping on Instagram until you have prepared your website or a platform (Etsy, eBay, Amazon, etc) you sell your products on. It should look authentic as well as all the products should have a name, code, price, and other specifications (size, color, weight, material, etc.).
Switch to Business or Creator Account
If your brand is already present on Instagram, it’s most likely that your account is Business or Creator. Nevertheless, we decided to remind you of this starting point.
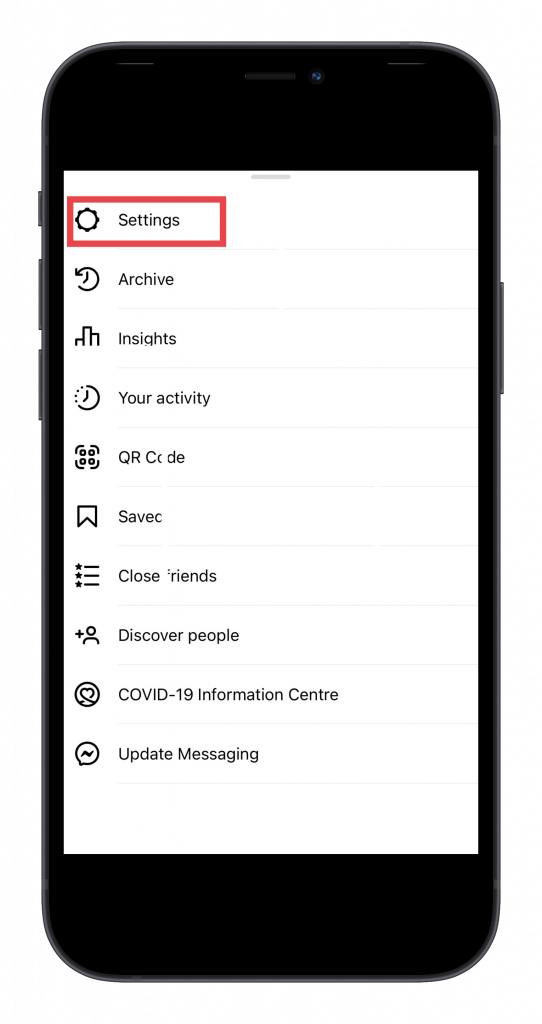
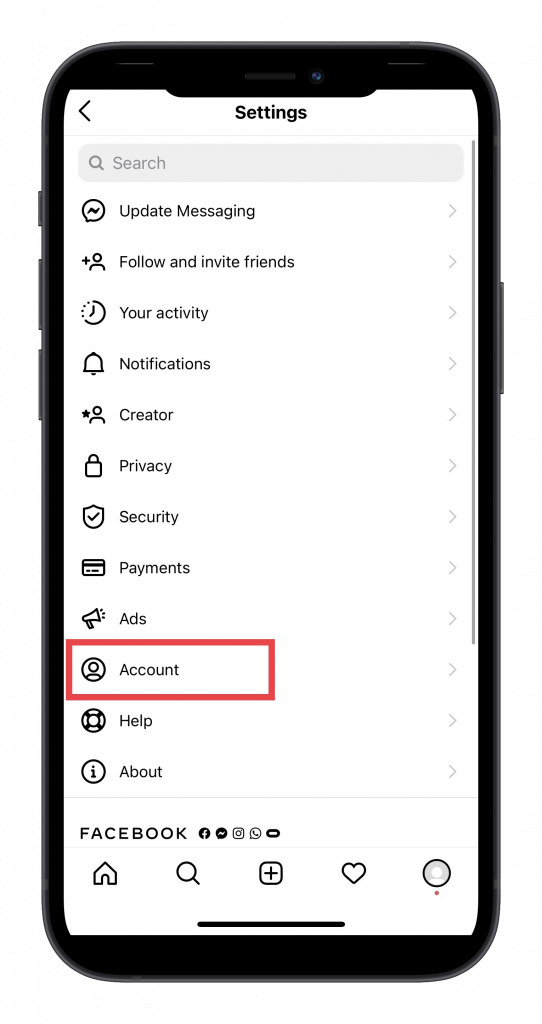
- Tap on the icon (three horizontal lines) in the upper right corner.
- Choose Settings.
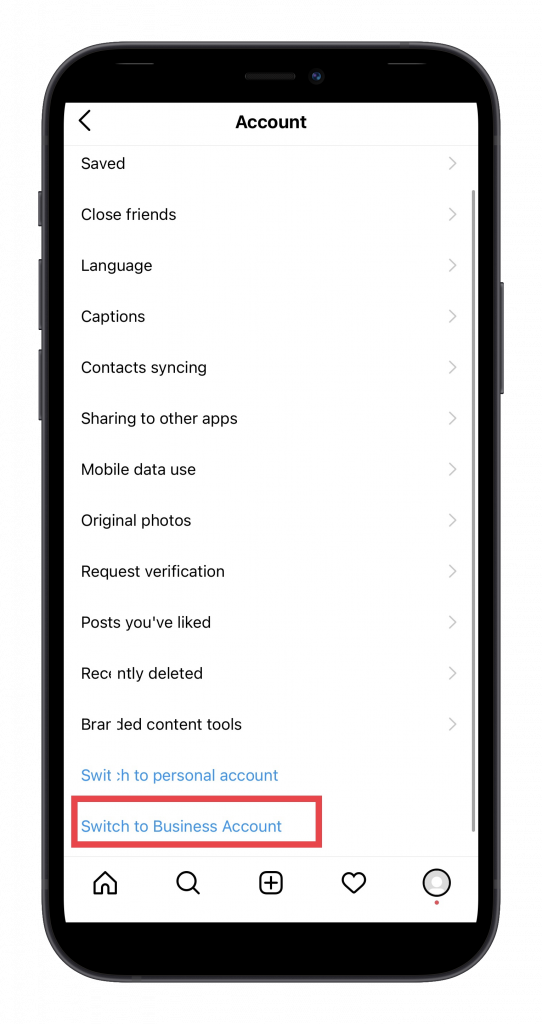
- Tap on Account, and then tap on Switch to Business Account (it’s at the bottom of the page).
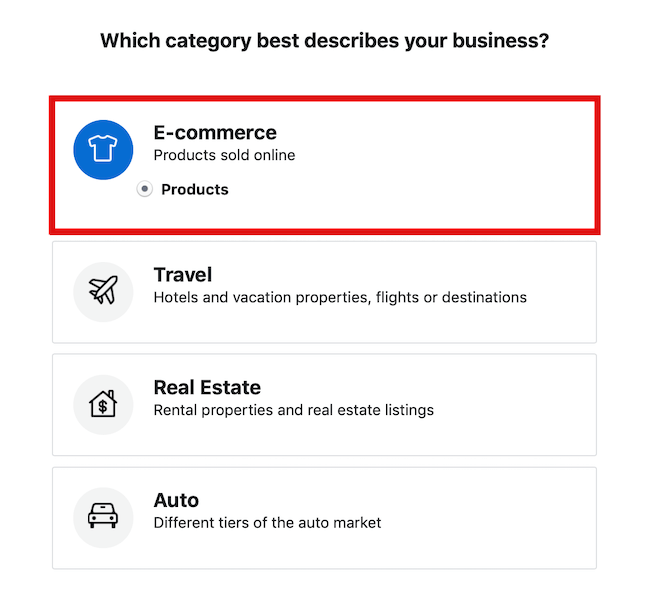
- Choose a Shopping & Retail category.
Link your Instagram account and a Facebook Business Page
This is the next step you need to take: connect your Instagram account to a Facebook Business Page or check whether your two accounts have been already linked. If you have a Facebook app on your phone, you will be transferred there. If you use a browser, you will be asked to confirm your account by entering your login and password. Having done this, go to Settings on Facebook, and check whether your Instagram account is linked to your page or not.
Set up a Facebook Business Manager Account
If you haven’t created a Facebook Business Manager Account yet, it’s vital to create it right away to move further. Go via this link, and follow step-by-step instructions. At this stage, you will have to fill in all the information about your business.
Set up a Commerce Manager
As far as you have already understood, to sell products on Instagram, you need to set up a shop on Facebook, first. Commerce Manager is set up inside Facebook Business Manager that you have created in the previous step. Go to your Business Manager, click on Commerce Manager under the Create & Manage section, and follow the prompts to get the things done. You will have to validate your business by providing your bank information, EIN, business address, and other important business details.
Create a Catalog with your products
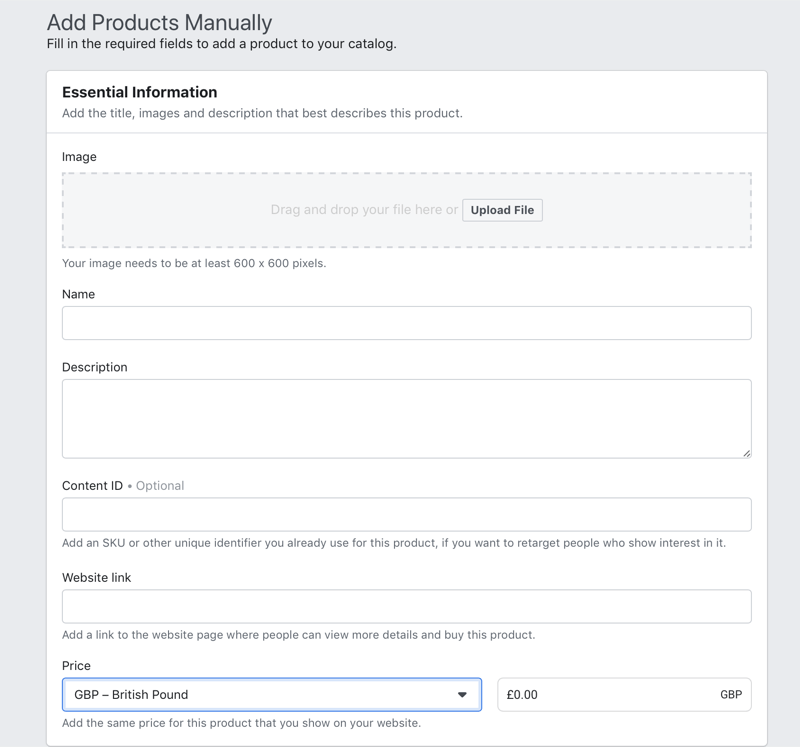
The Catalog is created in your Facebook Business Manager Account. Tap on a Catalog Manager in the settings, and then, in the upper right corner, tap on the Create Catalog button. At this stage, you will have to add a list of all your products, inventory, and descriptions manually. You can also upload the products in bulk from a Google Spreadsheet, for example. There is also one more way: you can automatically import products from the e-commerce platform. Learn more about this way here.
However, if you add your products for the first time, we recommend doing it manually to hone this skill and avoid making errors.
Keep in mind: you should add at least 10 products to set up an Instagram store.
Assign a Shopping & Retail category to your Facebook Business page
It’s also one of the most crucial things to do on Facebook now to create a shoppable Instagram account later. Instagram should see that the main activity of your business is selling products. The Shopping & Retail category is one of the proofs.
Add the action button to your Facebook Business page

All you need to do is to go to your Facebook page, click on the Add a Button (under your cover photo), choose Shop with You from the list, and then a Shop Now option.
Facebook will also ask you to add a website link. When someone clicks on a Shop Now, he will be immediately transferred to your website.
Add the Shop Tag to your Facebook Business page
There are two ways for adding the Shop Tag to your Facebook page:
The first option
- Use the vertical dashboard on the left of your Facebook page.
- Tap on Settings (at the bottom).
- Tap on Templates and Tags.
- Choose Shopping from the list of the Templates.
- Then move to Tags, and choose Shop, moving the toggle.
The second option
- On your Facebook page, there is a line with clickable words under the avatar and your page name. Tap on More.
- Tap on Edit Tabs in the drop-down, and choose Shopping from the list of the Templates.
- Tap on the Apply Template button.
- In the selection of Tags, choose Shop, moving the toggle.
If you have correctly proceeded with steps, such notification will appear on your page.

Apply for Instagram Shopping
Once you have gone through all the steps, you’re ready to apply for selling items on Instagram. In the Commerce Manager that you have already familiarised yourself with, go to Overview > Sales Channels > Manage > Business Assets > Instagram.
Follow the instructions step-by-step: add Instagram account > select Instagram account you would like to set up for Instagram product tagging (here you need to select that Instagram account that is connected to your FB Business page), and so on. The last button you need to click on is Apply for review.
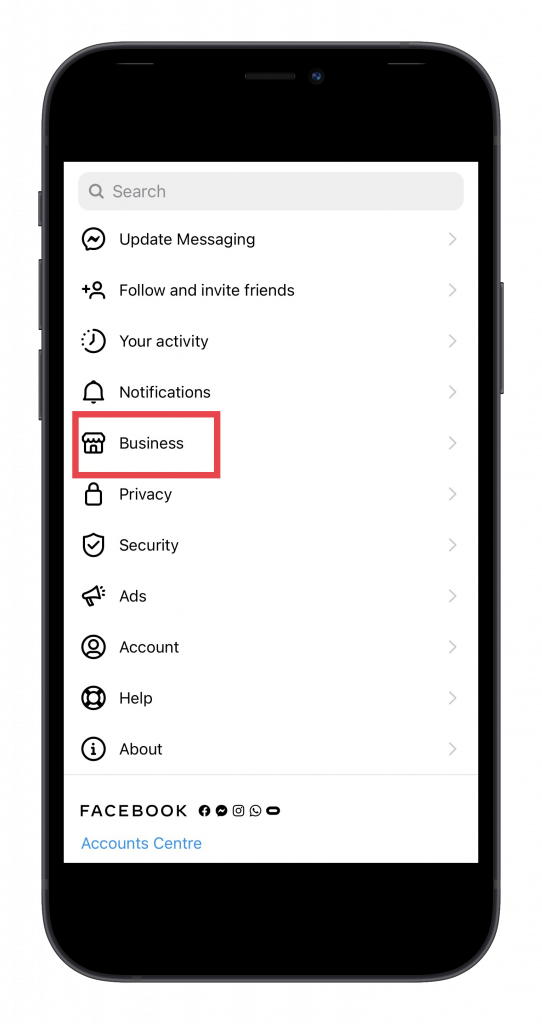
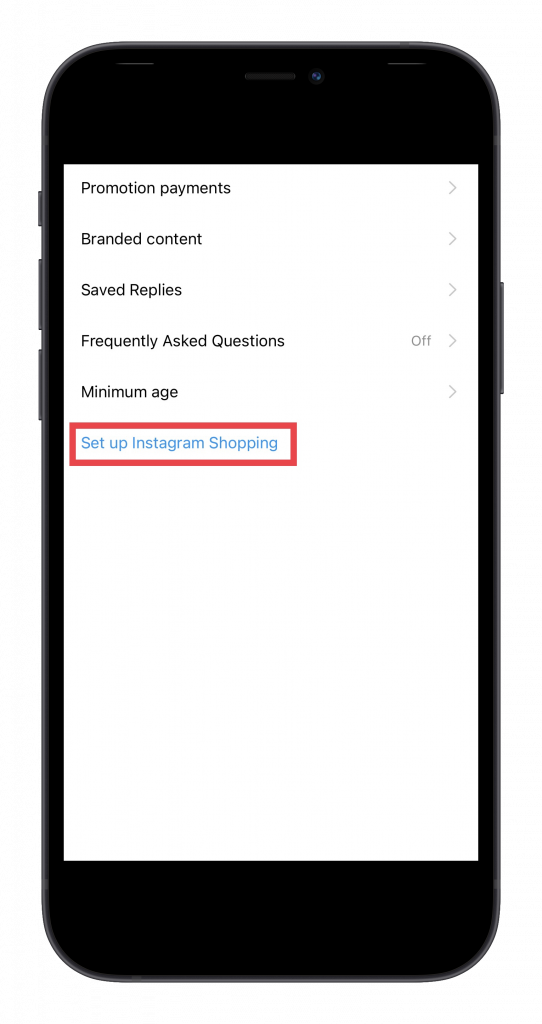
There is another way to sign up for Instagram Shopping within your Instagram account. Go to Settings > Business > Set up Instagram Shopping. To open a shop on Instagram, you will be asked to connect your Facebook Page and a product catalog. Then you will be asked to submit your catalog for review. Click on the Submit for Review button.
Frequently Asked Questions
How long does it take to approve Instagram Shopping?
It differs. Overall, it takes from a few hours to a few weeks to get approved for Instagram Shopping. If it is needed to review your account in more detail, approval can take up to 14 days. If you have the deadlines for having Instagram Shopping done, always keep in mind that the process of approval can be delayed, therefore, it’s necessary to plan the setup beforehand.
How do I know that my account has been approved for Instagram Shopping?
Usually, Instagram sends a notification like “Start Tagging Now”, and at this moment you know that your account has been approved.
If there is no such notification, the easiest way to know that your account has been approved for Instagram Shopping is to check your Instagram Stories. A new “Product” sticker will appear there, and you will be able to tag any of your products in Stories.
While publishing a post, there should also appear a new feature – Tag Products.
Last but not least: go to Settings > Business. If your account has been already approved, you will see a new line – Shopping.
My account was denied for Instagram Shopping and product tagging. What should I do?
If your account was not approved for Instagram shopping, the first thing you need to do is to go through all the steps described above from the very beginning and try to get approval one more time. Instagram doesn’t refuse without reason. You are most likely to have made a mistake while setting up an Instagram store, that’s why your account was denied.
Keep in mind: you can always get in touch with Facebook Help Centre. Follow this link, and fill in all the required details
Conclusion
Here is our guide on how to set up Instagram shopping to finally sell products on Instagram. We know that this task might look a little bit challenging. However, if you follow all the steps on our guide, your Instagram account will be definitely approved for shopping. Go ahead and have a pleasant setup!
We also recommend to read
 How to Check if Someone Bought Instagram Followers
  How to Promote Your Brand on Instagram in 2021
  How to Create a Successful Influencer Marketing Campaign
  How to Get Your Content Seen on Instagram in 2022
  Ultimate Guide To Reach Vs Impressions
  How To Make A Reel On Instagram (Plus Tips For Making Amazing Reels)
Instagram Engagement Rate Calculator For Free
Check any influencer's Engagement rate and analyze his or her followers growth history
Other free tools: Follower Count History, Instagram Follower Count, CPM Calculator
